D201GLY2 Heatsink Mod Posted
 Keeping it fresh with the launch of our series of articles about the Intel D201GLY2, Here’s a useful heatsink Modification guide, Do you wan’t to lower the temperature of your D201GLY2 with an easy mod? Follow this simple guide to get lower temps on this little board.
Continue on to D201GLY2 – Heatsink Mod by clicking here.
D201GLY2 Heatsink Modification Guide

The Intel D201GLY2 originally came in a fanless passive configuration, and according to Intel, was designed to rely on the fans of the computer case to cool the processor. If you were aiming to run this board passively, you may have been in for a big surprise, as the cpu can reach critical temperatures of over 100 degrees celcius! Intel later released the D201GLY2 that includes a small fan which would solve all your problems. It isnt so much that the CPU puts out a lot of heat, it is the fact that the stock heatsink isnt much thicker than an aluminum can. (Ok, I’m exaggerating, but it really is a very small heatsink.
Bottom line is, There is no way to run this board without a fan due to the extreme temperatures, unless you make some modifications. This page focuses on how to modify the stock heatsink, while one of my other pages focuses on undervolting the CPU itself. [Click Here for this article]
The Stock Heatsink:
The Stock heatsink is pretty comparable to a tall northbridge cooler, it is very light and thin, with tightly spaced vertical fins. Now, light and thin isn’t exactly what you are looking for in a cpu cooler, however with a fan, it is entirely adequate for the efficient conroe-L processor that the D201GLY2 sports. As always on this website, we like to tinker and tweak, so we found a way to enhance the performance of this little heatsink. I decided to adjust the spacing of the fins to allow more air to flow past the heatsink therefore improving the cooling performance.
Here is a shot of the board stock, with a small fan:

Modding:
First get yourself a metal ruler and some heatsink paste (Intel recommends using a thermal pad, but only because they are pansies and think that you will fry your chip if you try to do anything yourself. That and without a heatspreader on this cpu, it is easier to knock the heatsink off the chip. Be Careful!)
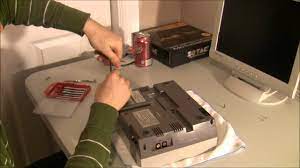
OK, Now you will have to remove the clip that holds your heatsink in place. Pretty straightforward, but here is a tip: Just remove one end of the clip at a time. If you try to do both at the same time, you may crush your processor, or just the tips of your fingers. By working on one end at a time, you have to exert less force, and the clip comes off much easier.
Here is a shot of the board once the heatsink is removed:

Now take the heatsink and if possible avoid touching the bottom surface so you dont get it greasy with the oils from your hand. Gently bend the fins out starting with the fins closest to the edge. Your goal is to make an arc with the fins evenly spaced out from the middle. A 45 Degree angle is pretty much all that is possible because of the capacitors in the way. But for now just focus on bending the fins evenly. Here is my first bend:

Keep working carefully bending the fins out, try to make them evenly spaced as that will get you the best results. The aluminum bends quite easy and it definitely could snap, but it is pretty resiliant, just be careful and you wont have any broken fins. Here is the next shot:

Pretty isn’t it? Once you have it bent to your liking, clean the heatsink and the cpu with some alchohol or other heatsink cleaner and get ready to apply some thermal grease, Im using some Zalman STG-1:

Now, before you go swabbing that thermal grease on there, be sure to test fit your heatsink and make sure that it fits in place, you will definately have to bend a few of the fins to fit around the capacitors that are sitting on the board. Once you are sure that your heatsink will fit back into place, put your grease on and remount the heatsink back how it originally was seated. (You did take note of this right?)
Here is a final result picture of how my modded heatsink looks on the board:

Results:
Now the real question is….. Did we even accomplish anything here?
When I modded my heatsink, I had already undervolted the processor [See this article]. Here are the temperature results before and after while sitting at idle:
BEFORE MODIFICATION: 62 Degrees Celsius (After 30 Minutes Idle)
AFTER MODIFICATION: 56 Degrees Celsius (After 30 Minutes Idle)
As you can see the wider spaced fins allow the system to function much cooler than before as more air is able to flow past the previously closely spaced fins.
I hope this guide was usefull, if so please post your results in our forum Here.