D201GLY2 – Undervolting Mod Guide
Introduction:
The Intel D201GLY2 originally came in a fanless passive configuration, and according to Intel, was designed to rely on the fans of the computer case to cool the processor. If you were aiming to run this board passively, you may have been in for a big surprise, as the cpu can reach critical temperatures of over 100 degrees celcius! Intel later released the D201GLY2 that includes a small fan which would solve all your problems. It isnt so much that the CPU puts out a lot of heat, it is the fact that the stock heatsink isnt much thicker than an aluminum can. (Ok, I’m exaggerating, but it really is a very small heatsink.)
Click to read more:
CPU Voltage Mod
The Celeron 220 that comes with the D201GLY2 runs at 1.35 volts, and to me, that seems an unreasonably high voltage. I’ve seen core 2 duos that run at much higher speeds at 1.2volts, and I’ve even undervolted many core 2 duos to run at around 1.05 volts at idle. The Celeron Running at 1.35v @ 1.2Ghz can definitely handle a bit of undervolting.
I hear everyone asking… “How do I accomplish this?” “I don’t see any voltage settings in the bios…” “You are full of crap Cbutters.”
Well, thanks to some german friends, I have rediscovered an old trick; The draw on the computer with a pencil to adjust the resistance and make it operate out of specification trick. Awesome!.
By performing the mod I am about to show you, you can reduce your voltage as low as you want, (although, if you go lower than 1.1 volts, your computer will most likely shut off and you will have to brush off the pencil lead to make it work again.)
The Guide:
You will need for this mod: A mechanical pencil (with 2B pencil lead)
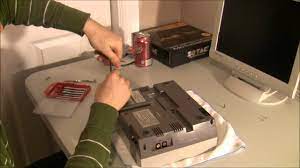
First off, locate the screw hole on your motherboard right behind the keyboard/mouse connectors, the following image will be most useful in locating what we need to undervolt this board (click on the image to make it bigger if you need):

Now, that you have located the trace that you need, (take note that it is the same trace that the long green loop that is printed onto the circuitboard hits as it loops around the black intergrated circuit.) Boot into you BIOS, go to Advanced Settings, then choose Hardware Monitoring. Here you will see a screen that is reporting your voltages.
Go ahead and start drawing back and forth between the two silver parts of the trace. Keep an eye on your voltage. You should see it dropping as you do this. If you draw too much, the voltage will lower too far and the computer will shut off. Don’t worry, just get a q-tip and take some of the lead off. I found the sweet spot for stability and low voltage was at about 1.144 Volts. Here is a screen of the bios:

Notice that my Vccp is now at 1.104!!!! Sweet. Now this little board uses even less power. (the picture was taken right as I lowered the voltage, which is why the cpu is still running hot there.)
Results:
Ok, did we accomplish anything here besides voiding our warranty?
Well, I did the tests for you.
The computer was booted from being completely turned off and room temperature, then left alone for 5 minutes either at idle, or running Orthos Prime, after 5 minutes the temperature was recorded.
First; a little Reference Table:
|
FAN |
idle Vcore |
Load Vcore |
Cpu Idle Temp |
CPU Load Temp |
System Idle Temp |
System Load Temp |
And the extracted Graphs:


Here are a few screenshots of Testing,
First stock voltage with fan on:

Then stock voltage with fan off:

Now we have the screenshot of the lowered voltage (1.1) with fan off (check out the significantly reduced temps with passive cooling !! :D) :

Conclusion:
So we can see by undervolting this little board, we can allow it to function at much lower temperatures than usual. At stock voltage, if you tried to run this thing passive, you would be sorry. With no additional cooling at full load, the cpu can easily climb past 100 degrees celsius. In fact I had to abort my testing at full load at stock voltage running passively because I was worried the cpu would desolder itself! These chips are designed to operate at up to 100 degrees celsius, but it definitely is NOT recommended.
After reducing the voltage with the pencil trick, to 1.1 volts, even at full load, the board is not even close to self-destructing like it was before! The maximum I ever saw it reach after letting orthos run, and on a hot day was 75 degrees celsius. And if you do my heatsink modification [Click here to see the article]; You will have even less problems. Either way, letting your processor run cooler is always good.
One thing I noticed during testing was that if you lowered the voltage too far with the pencil lead, the computer would just suddenly turn off, but I never saw orthos throw an error no matter how low I went. It seemed to either work or it didnt.
Let me know how it went for you in our Forums [Click Here]