E6600 and Ultra 120 Extreme Lapping
 I finally received my new heatsink that I ordered what seems forever ago (about 3 weeks), the Thermalright Ultra 120 Extreme showed up at my doorstep this week, I planned on using it in my overclocked main work machine. It is a Core 2 Duo E6600 based machine running at 3.2 Ghz with an ASUS p5B Deluxe motherboard. Since I was going to be taking my computer apart anyways to install the new heatsink, I decided to go extreme in my overclocking efforts, I decided to “lap” both my processor and new heatsink.
Now if you have never heard of lapping before, let me explain it to you. Before you can appreciate the idea of lapping you need to understand the theory behind it. The idea is that because of errors in the manufacturing process, the heat shield of your processor and the base of your heatsink may not be exactly flat, the heatshield can be concave which means that the outer edges of the heatshield will prevent the core of the CPU which is at the center of the chip from making proper contact with the base of the heatsink. Alternatively, the base of the heatsink may not make perfect contact with the heatshield of the CPU. usually to overcome these geometric mismatches is to use thermal paste to fill in the gaps between these two components.The problem is, thermal paste doesnt conduct heat nearly as well as metal itself. The solution… is to “lap” your heat shield or your heatsink or both, which consists of sanding them down on a very flat surface to close the gap between the two components. The closer or flatter you can get the metal in the heatsink and the metal of the processor, the more efficient the heat transfer between the two components will be. Which means a cooler running processor which translates into better stability and may or may not translate into higher overclocks.I lapped both my Thermalright Ultra 120 Extreme and my E6600.Here is how its done.
First you will need the following items.
-A very flat piece of glass (I used a 1/2 inch thick glass tabletop.)
-Automotive wet/dry assorted sandpaper 220, 400, 600, 800, 1000, 1500 grit. (you can skip a few grits inbetween if you want.)
-Masking Tape
-Rubbing Alchohol (the higher the percentage the better)
-compressed air (optional)
-Q-tips
Here are the required items laid out for you:

Step 1: Clean your work area.
If you want the best results possible, you need to have very close attention to detail, first clean your work area very carefully, especially be sure to clean your glass off very well so that there is no residue or bits stuck to the glass that may make the sanding process uneven. Also clean off any thermal paste residue that might be on your processor. (it will get sanded off anyways, but we dont want to gunk up our sandpaper too quickly.)
Step 2: Mount the sandpaper
Using the masking tape, mount the lowest grit sandpaper that you are going to use, onto the glass. You want to start with one edge first then slide your thumb over the edge to make it tape down completely flat, then move to the next edge and do the same thing, then you should have a piece of sandpaper mounted completely flat onto your flat surface. Some people like putting a bit of water down before they put the sandpaper down so the water’s surface tension pulls it down flat onto the glass, or they are just planning on wetsanding. I didnt feel that water sanding was necessary until I was into the 1000 grit sandpaper because the sandpaper isnt quite as effective at sanding when it is wet and it would end up taking longer.
Step 3: Start sanding “lapping”
With current intel processors there are no pins on the CPU which makes lapping easier, Most people like to use the black plastic shield that comes with it to protect the contact points. For AMD processors with pins you want to use the foam that came with the processor over the pins and take extreme care not to bend any pins. As long as you dont get any water under your heatshield and clean it off when you are finished lapping, the risks of lapping are very minimal. (I won’t be taking any responsibility if any of you break your processors in the process of doing this).
Here is my processor ready for lapping.

Here is my ultra 120 before lapping, the base was quite uneven, it had a bulge in the middle which I verified using a razorblade, I could actually roll the razorblade on the hump quite a few degrees!:

There are a few main methods for sanding the processor and heatsink down, figure eights, circular motion, back and forth, rotate 90 degrees, back and forth. I would suggest that on the first pass on the lowest grit sandpaper, any method should suffice as our main goal is to get down to the copper metal below the nickel finish while making the surface as flat as possible. You will want to apply firm but gentle pressure while sanding, try to give even pressure so that the sanding takes place evenly. You will see your laser etched information dissappear very quickly (along with your warranty), so make sure to write down any information you wanted off it. For the heatsink, lapping is a bit trickier, as it is larger and harder to move around without it falling over, try to hold it close to the base, or the main block low on the heatsink, if it is wobbling while you are sanding, then it wont turn out right. go slow until you figure out the best way to do it. Lapping with the first grit sandpaper is the longest step, as you need to get all the nickel off which can be time consuming, especially if your parts arent flat to begin with.
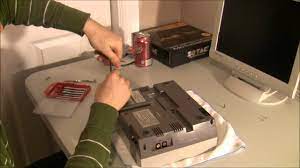
Here is the process taking place:

And Here are my components after a few minutes of lapping:


You can see the copper just starting to come through on the CPU, you can see the corners of the heat shield were a bit higher than the middle, but it was pretty flat as it was to begin with. Other people have reported cpus that are very convex and they will benefit the most from lapping.
You want to use your first grit sandpaper until you are all the way down to the copper and your surfaces are very flat, (use a razorblade to test flatness, check it horizontally, vertically and even diagonally. You can use the compressed air to blow off the copper powder that is getting everywhere, if you keep the sandpaper clean of that dust, it will help speed the sanding process up.
Here they are after more lapping:


And here is the first grit of sandpaper completed:

You can see that there are some edges that still have low nickel edges, my cpu dipped on those spots and any more sanding there at this grit was irrelevant since it was so far on the edges.
Step 4: Work your way up through the grits.
You can now move onto the next grit up of your sandpaper, Now the trick is being very even and deliberate in your sanding, I would recommend doing back and forth motions, and then rotating 90 degrees every 30 strokes or so from here on out, as it will help make it the most even it can be. There are two differing points of view on how high a grit you should use, most people say that anything past 600 grit is overkill, and others say that a mirror finish (2000 grit plus polishing) makes a difference for them. I tend to agree that once it is flat, it is flat and anything higher doesnt matter as far as temperatures, but if you are going as far as lapping your processor, you might as well make it shiny, just in case, and to have a little bling to show off! I went up to 1500 grit. I only wetsanded with a few drops of water on the final sanding pass with 1500.
Here are my results:


Its not quite a mirror finish, but good enough for me.
Here is the processor ready to go:

Temperature RESULTS!
As far as temperatures go… I have no scientific way of testing if this made a difference for me, as my heatsink was never used unlapped. but I was using a Scythe Ninja Rev B before this heatsink and I dropped a degree or two celcius from before at idle and 3-4 degrees celcius cooler at load. Whether it was from lapping or the heatsink itself, I couldn’t tell you.
My 2 Cents on Lapping:
Lapping might not be for the faint of heart, but it is certainly easier than most people think, and if you get a bit more performance for a $4.99 pack of assorted sandpaper, I say it is worth it. Especially for the computer enthusiast who pays 60 bucks for a performance cooler, or 200 dollars more for performance ram vs value ram that most likely wont make more than a 2% difference anyways. For these people, lapping seems pretty tame. As far as loosing your warranty by lapping, this is a valid concern,….. But when was the last time you had a CPU die on you? I have owned close to 30 different processors at different times, and not one has ever died on me. I have only heard of cpus blowing out on extremely high overclocks or idiots who remove their heatsinks when the computer is on, (which shouldnt be a problem nowadays on intel chips due to thermal throttling) Heck, I have a Pentium I MMX chip that still powers up. I wouldn’t worry about the warranty people. As long as you take care not to bend a pin, or submerge your cpu in a cup of water. Nothing is going to happen.
Happy Lapping.
P.S.
If you want to see some other mods I did at the same time on my Asus P5B Deluxe, and the modified mounting process that I used for my ThermalRight Ultra 120 Extreme, Click here.