Securely Mounting the Ultra 120 Extreme + P5B Deluxe Mods
 The Thermalright Ultra 120 Extreme has become very popular recently as the ultimate air cooler. Unfortunately the extreme is also becoming a bit notorious as having some quality control issues, mainly due to the new mounting procedure. Because there are more heatpipes, the clamp that holds the Ultra 120 Extreme to the CPU is a scissor design which can be opened and then closed.
I’ll show you how to mount this cooler securely, continue on to the article by continuing
The Thermalright Ultra 120 Extreme has become very popular recently as the ultimate air cooler, this has come about based on various reviews, especially the Anandtech review which showed it cooled their Intel Core 2 processor better than any other heatsink. The Ultra 120 Extreme is an update to the original Ultra 120, the difference being two additional folded heatpipes built into the block. Unfortunately the extreme is also becoming a bit notorious as having some quality control issues, mainly due to the new mounting procedure. Because there are more heatpipes, the clamp that holds the Ultra 120 Extreme to the CPU is a scissor design which can be opened and then closed. Unfortunately, it doesnt do as good a job as a solid piece of metal as far as holding the cooler to the CPU. The design feels loose, and the heatsink can be twisted back and forth quite easily. Which for some people, made the awesome heatsink design ineffective due to improper pressure.
In efforts to fix this, I have scoured the web, and have seem fixes from adding washers to the springs, slipping foam padding under the clamp, pennies, dimes, silver dollars, or even cardboard from the box. (thanks to all those at xtremesystems forums.) Here I will show you what I came up with while mounting my Ultra 120 extreme, hopefully it will help you if you decide to buy this cooler, or if you perform a remount. My solution was to use a large washer to increase the mounting pressure
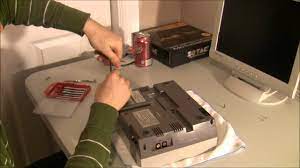
First lets look at the scissor clamp design:

As you can see one metal leg is on top of the other which means that only one metal leg will be making contact with the heatsinks block. In addition there is a screw in the middle which holds the two legs together, and also the head of this screw is lowered into the hole on the block of the heatsink itself to hold it in place, it does not however keep the heatsink from sliding and rotating clockwise and counter clockwise.
Rather than use a coin of some sort, or foam that would compress over time, I used a washer that already had an existing hole in the center for the screw to still be able to lower down into the base/block of the ultra 120 extreme. The washer itself was steel and had a 1 inch diameter and a 2-3mm thickness. I had lapped my heatsink previously as seen here: http://192.168.1.211/?page_id=81 So I figured that I had shaved a bit of the bottom off of the heatsink with my sanding so the additional space being used by the washer puts additional pressure on the springs which means the heatsink sits tighter. Here is my work in action:

This washer kept the heatsink on very securely, I mounted my heatsink from the beginning like this, so I do not have before and after temperatures, but if you are looking to securely mount your Ultra 120, and get additional pressure to drop your temps, this is the way to go. My heatsink wont budge at all and wont spin on its axis like my brother’s ultra 120 extreme does. Try it for yourself..
Additionally, I own the ASUS P5B Deluxe WiFi/AP motherboard, I noticed that the mosfets around the cpu socket have a heatsink mounted on the left side of this motherboard, yet the top portion did not have any heatsinks on the mosfets along the top of the board, even though there were holes for mounting one. Since I always like modding my stuff, I came up with an idea to provide a bit of passive cooling to these mosfets. I had some ramsinks lying around from a Radeon 9600 cooler I had purchased a while ago. these ramsinks seemed the perfect size for the mosfets, so check it out:

The ramsinks have self adhesive thermal glue on the bottom which made installing them a snap. Here are the finished results:

and compared to the rest of the board:

I think it matches the board nicely. Hopefully it will help me reach a little bit higher overclock. Who knows, but they definitely won’t hurt.